Wednesday 17 December 2014

#24 - Salted Caramel Cheesecake with Macadamia Nuts

Yum

Qns: Name one dessert that your hubby is nagging / pleading / demanding you to make for him for the past months! 

Ans: CHEESECAKE! 

The last time I baked a cheesecake was more than a year ago and since then, my mister at home has never failed to remind me how much he is in love with my baked cheesecake and how rarely I bake for him lately. To be honest, he is not wrong. So, after our recent trip to Club Med Bintan, I decided to be nice to him and just let him indulge in the 1kg worth of cream cheese in this new recipe I have tried out - Salted Caramel Cheese with Macadamia Nuts. 

Compared to my previous recipe for Baked Cheesecake with Kiwi Topping, I did some minor changes to the proportion and it still taste as good as before! In my opinion, the magic was in the addition of the sour cream! It really helps in giving the cheesecake a tangy taste to it. 

In fact, the Baked Cheesecake was looking really good when I got it out of the oven. And then, (I blame it on my own impatience) due to the fact that I did not leave it long enough in the oven to cool off before transferring it to tabletop to cool completely, it results in a horrible looking crack right at the centre of the cheesecake. So indeed, patience is a virtue. Lesson learned. 


What I did next was to quickly fix the crack on the cheesecake with help from the following YouTube video, before sending it to the fridge to be cooled further. 


After staying in the fridge for 6 hours, the cheesecake turned out really well! To top it off, I crushed some macadamia cuts and sprinkle them over the top of the cheesecake before drizzling the cake with some salted caramel sauce. Yummy! 


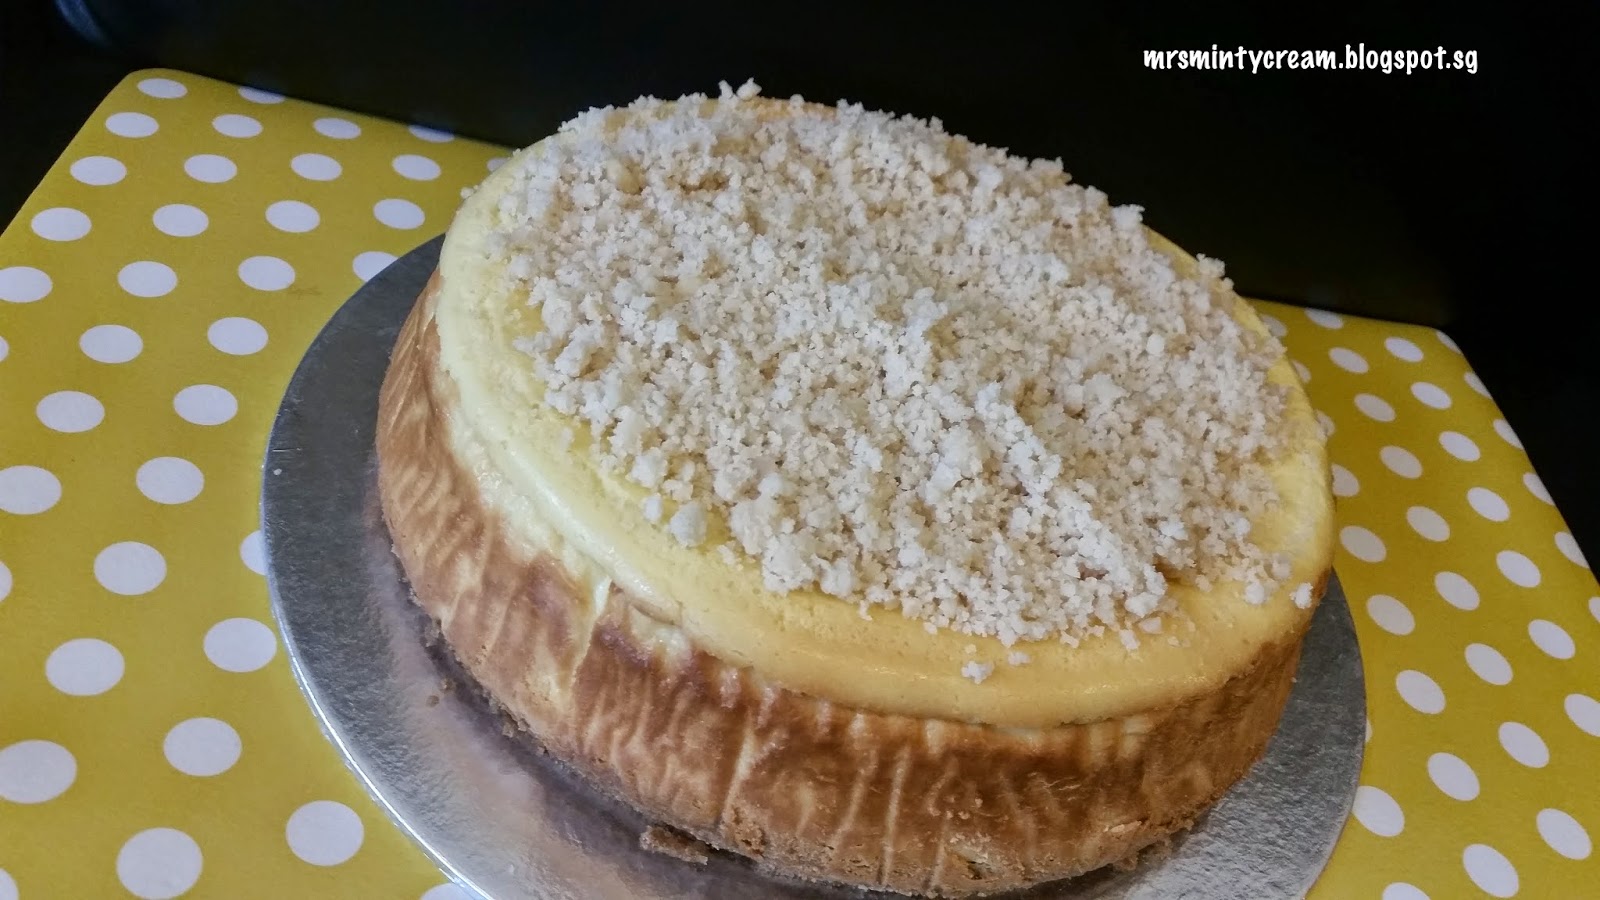
The cake was creamy, yet tangy and the caramel sauce was sweet yet salty. Not to mention, my hubby is in love with the buttery biscuit base of the cheesecake and me, with the nutty macadamia nuts topping. Go give this recipe a try and share it with me! 


***************
Recipe: Adapted & modified from here.

Servings
Make approximately 8 - 12 pieces

Ingredients
Biscuit Base
2 cups digestive biscuits, crushed
120g unsalted butter, melted

Cheesecake Filling
1000g cream cheese, softened at room temperature
1 cup sugar
4 eggs
3/4 cup sour cream
1/4 cup all-purpose flour, sifted
1/2 tsp salt, sifted
1 tsp vanilla extract
zest from 1 lemon
juice from 1/2 lemon

Salted Caramel Sauce
1/2 cup brown sugar
1/4 cup heavy cream, room temperature
2 tbsp unsalted butter, softened at room temperature
1/2 tsp vanilla extract
1 tsp salt

Topping
100g macadamia nuts, crushed


Method
Biscuit Base
1. Preheat oven to 160 deg C.

2. Grease baking pan (Medium spring form cake pan, diameter 23cm) by spraying a layer of non-stick spray around the base and side of pan before lining the base and side with baking paper. Also line the base with aluminium foil on the outside. Set aside for later use.

3. To prepare the digestive biscuits crumbs for base & macadamia nuts for topping, you may either break up the biscuits / nuts into crumbs using a food processor or place them in a zip lock bag and break them up to crumbs by rolling a rolling pin over them in the bag. Set aside the crushed biscuits and macadamia nuts separately for later use.

4. Add in the melted butter to the crushed biscuits and mix well. The mixture should look like wet sand.

5. Pour the biscuit mixture into cake pan and pressed it firmly and evenly in the pan. I make use of the base of a ramekin to help me achieve an even layer. Bake for 8 minutes in the centre of the oven and set aside while making the cheesecake filling. 

Cheesecake Filling
1. Using a mixer, cream the cream cheese with sugar to ensure a good mix. Add eggs, sour cream, flour, salt and vanilla extract into the mixture and mix until smooth. 

2. Add in the lemon zest and lemon juice to the mixture and mix well. Once there are no more lumps in the mixture, you may stop mixing. Do not over mix so as to prevent cracks on the cheesecake. 

3. Pour the cream cheese mixture over the biscuit base. Shake / tap the cake pan on the tabletop lightly so as to ensure that the filling is evenly spread and any air pockets within the mixture are removed.

4. Bake in the oven for 1 hour. Leave the cheesecake in the oven to cool for an hour with the door ajar.

5. Remove from the oven and cool it completely on table top (I cooled it for 6 hours) before transferring the cheesecake to the fridge to chill for at least 4 hours. 

Salted Caramel Sauce / Topping
1. Using the double boiler method, heat up the brown sugar, heavy cream, unsalted butter, vanilla extract and salt. Keep stirring until the brown sugar is completely dissolved. The mixture should be gooey.


2. Before serving, sprinkle the top of the cheesecake with the crushed macadamia nuts and drizzle each slice of the cheesecake with the salted caramel sauce. 


Saturday 26 July 2014

#23 - Claypot Chicken Rice (Rice Cooker)

Yum

When you are sick and tired of packing food from food courts or even kopitiams for dinner, you will seriously be craving for something that is warm & comforting, something simple like a home cooked meal, something just like this.

If you know me, you will know that I'm pretty much a fuss-free person. Though I adore cooking and baking, I have never really get myself done to experimenting with complicated recipes, let alone cooking meals involving 101 ingredients. I am more of a less-is-more kind of person! I love following and trying out simple yet yummy recipes and when I'm in the right mood, I give it my own twist!

This Claypot Chicken Rice is simple enough and if you have a pan and a rice-cooker, you can make this.


For the cooking of the main ingredients, original recipe actually call for the raw ingredients to be added to the rice when the rice is half-cooked. However, since hubby and I prefer the rice to be slightly dryer, I did it slightly different. I allowed the rice to be fully-cooked while I stir fry all the ingredients (chicken, mushrooms, sausages) with some garlic in a separate pan until the chicken is semi-cooked. When rice was cooked, I poured all the ingredients onto the rice in the rice cooker and cook the rice again. It turned out that the rice was nice and dry and the it tasted really yummy!

So, give it a try and enjoy some warm and nice comfort food from home :)


***************

Recipe: Adapted and modified from here

Servings
4 persons

Ingredients
3 cups Rice (to be cooked with 3 cups Water)
2 Chinese Sausages
50 - 60 grams Dried Chinese Mushrooms
100 grams Button Mushrooms
2 Deboned Chicken Thigh Meat (diced)

Seasonings
2 tbsp Oyster Sauce
2 tbsp Light Soya Sauce
1 tbsp Dark Soya Sauce
5 tbsp Chinese Cooking Wine (花雕酒)
2 tsp Sugar
White Pepper

Directions
1. Rinse and drain the uncooked rice. Cook the rice in rice cooker using 3 cups of water. 


2. Soak the chinese sausages and dried chinese mushrooms in hot water for 2-3 mins. 

3. Remove the casing of the sausages and sliced it. Once the chinese mushrooms are soft, removed the centre stalk before slicing it. 


4. In a large bowl, marinate all the ingredients (chicken, both types of mushrooms, sausages) with oyster sauce, light soya sauce sauce, dark soya sauce, chinese cooking wine, sugar and white pepper. 


5. In a saucepan (with some garlic), stir fry the marinated ingredients over medium heat until the chicken is semi-cooked. Do not over cook the chicken. 


6.  When the rice is cooked, transfer the semi-cooked ingredient to the top of the rice and let the rice cook for a second time. 


7. Before serving, stir and mix the rice and ingredient together. Make sure that the contents are well-stirred. You may add some additional dark soya sauce upon stirring to achieve your desired colour preference. 


Wednesday 7 May 2014

#22 - Bak Kwa (Barbecued Pork Jerky) Sandwich

Yum

I know that I ought to be kicked for totally neglecting this site of mine. To be totally honest, I have not been doing much baking / cooking for the past 4 months at all. Yes, I am aware of that. As much as I would like to, I just can't seem to find the right time / mood recently (excuses!). I guess I am displaying my talent for procrastination to my best ability, once again. This is really a bad habit that I must kick (soon).

Anyway, I met up with Mum last week for a short lunch and as usual, she came with loads of goodies for her am-very-fat-daughter, Your Truly. Out of the many goodies, this has got to my hubby's favourite - Bak Kwa! I am not such a great fan for Bak Kwa since it is more like a CNY treat for my family. But rather than having Mr. Lim munching on the Bak Kwa plainly (not to mention, after dinner!), I decided to save them for making some breakfast sandwich for the man instead.

These are the two versions which I am sharing today. One slightly more elaborated than the other, but both as tasty!

This is what Mrs. Lim (That's me!) had for breakfast this morning! Healthy and Yummy! 

And this is what Mr. Lim brought to work as his breakfast! 
Extra Bak Kwa at the side for his to munch on! 


I just could not resist and had to take two (not one)  HUGE bites!


***************

Servings
3 Sandwiches

Ingredients
6 slices of Wholemeal White Bread 
2 eggs 
Butterhead Lettuce
2 slices of Cheddar Cheese
Japanese Mayonnaise 

Directions
1. Using a saucepan over medium heat, fry the eggs (sunny side up or over-easy, according to your desired preference). 


2. When the egg is almost done, place the slices of lightly-buttered bread on the hot saucepan. Toast it for 2-3 minutes and you will get a lightly brown crisp bread. 


3. Wash and pat dry the Butterhead Lettuce. Place the lettuce on one slice of bread before adding a slice of Bak Kwa on top of the lettuce. If you would like to, you may heat up the Bak Kwa slightly before assembling the sandwich.


4. Add the fry egg and a slice of cheddar cheese on top. The heat from the egg will ensure the cheese melts a little before serving. 


5. Top with more lettuce, Japanese Mayonnaise and lastly, a slice of bread. 


And then, you have it! A perfectly simply and yummy sandwich to be packed for breakfast or even a on-the-go lunch! Add in some fruits and MORE Bak Kwa and you have it!


#P/S: For the simplified version, simply omit the use of egg and cheese in Step 4 and you have it! Equally tasty! 


Wednesday 1 January 2014

#21 - Salted Oatmeal Scotchies with Chocolate Chips

Yum


Happy New Year to one and all!! It is the start of a brand new year for all of us and I'm pretty sure it is going to be a splendid year ahead. Other than growing a year older, I am pretty excited to get the year started! 

Personally, 2013 has been a really great year for me. I finally took a step towards my own vision of how I wanted my life to be like (personal as well as work wise) and with the support of my love ones, everything has turned out just right! 2013 has also allowed me to spend more time with my family and friends. This is so important to me now, especially when my brother is out of the country. In terms of work, I have found the stability I needed and I am loving every minute of my teaching time now. The past year has also allowed me to bond with these new students of mine on a different level and I'm so proud to say that I have done my very best to coach each and everyone of them at their differing learning levels and to add on to my pride, all my students did well for their examinations. Kudos to them for their hard work and perseverance. They have proven to me that I have made the right choice and it is all worth it. 

Carrying forward the positive energy from 2013, I hope 2014 is going to be filled with good health, sweet happiness and so much love from your love ones! Let us all count our blessings from 2013 and welcome the joy that 2014 will be bringing us. 


At Mrs Minty Cream, what better way is there than to start off our 2014 with a lovely post on my latest baked goodies, Salted Oatmeal Scotchies with Chocolate Chips. For those of you who are familiar with oatmeal cookies, you will know that many of the recipes involved the addition of raisins. While I agree that the texture of the oatmeal and raisins do complement each other very well, I did not want to do that as both my hubby and myself aren't great fans of raisins. Furthermore, since I have some butterscotch morsels left over from making my Butterscotch Molten Lava Cake with Chantilly Cream last week, I decided to make these Oatmeal Scotchies. I have also added in some chocolate chips to make the cookies more flavourful and at the same time, I added a touch of sea salt to the cookies which in my opinion, was the icing on the cake! The contracting flavour in the salt and the sweetness from the morsels/chips was a great combination. Hubby and I love these cookies so much! Trust me, you will have to make these to share with your family to show them some love today. You just have to do it! 


 ***************

Recipe: Adapted and modified from here

Servings
Make approximately 4 dozen cookies

Ingredients
1 and 1/4 Cup All Purpose Flour
1 Tsp Baking Soda
3/4 Tsp Cinnamon
198g Unsalted Butter
1/2 Cup Fine Sugar
1/2 Cup Brown Sugar
2 Eggs
1 Tsp Vanilla Extract
3 Cups Oats
1 Cup Butterscotch morsels
1 Cup Chocolate Chips

Directions
1. Preheat oven to 190C.

2. Prepare 2 large baking trays and line them with baking paper. Set aside for later use.

3. Combined the flour, baking soda and cinnamon in a mixing bowl. Sift this flour mixture and set it aside. 

4. In a bowl, cream together butter with both sugar until light and fluffy. Do this for at least 2 to 3 minutes to ensure a good mix.

5. Add egg and vanilla extract into the mixture and beat until smooth. 

6. Add in the flour mixture (in Step 3) 1/3 portion at a time and mix well to combine.

7. Add the oats, butterscotch morsels and chocolate chips to the batter and use a spatula to mix well. Ensure that all the ingredients are well-incorporated.

8. Use a small ice-cream scoop to divide the dough into small portions (ball-shaped) and place them on the baking trays. Ensure that they are at least 3 cm apart from one another. Flatten the top of each small cookie dough with the back of a teaspoon lightly. 

9. Bake for 8-10 minutes, until the edges of the cookies start to turn light golden brown. Allows the cookies to cool on the baking trays for about 5 minutes before transferring them to a cooling rack to cool completely. Before serving, sprinkle the top of each cookie with a few flakes of salt. 

Related Posts Plugin for WordPress, Blogger...