Showing posts with label Cake. Show all posts

Wednesday, 11 January 2017

#54 - Fruity Swiss Roll

Yum

Start of a new year, 2017!

I know I was not baking much for last year and this year, I hope to set things right! I really hope to keep to my resolution of uploading one recipe a week. Baking and sharing recipes are things I do to keep myself sane amidst my work and other chores. It is like a personal me-time. Since I enjoy these times so much, I promised myself that I shall work much harder to keep to this resolution of mine this year. I hope, I really hope so.

This is the second week of the year and I am starting my year with a Fruity Swiss Roll bake. I bought some really fresh good eggs from the wet market the other day and I was excited to use them in my bakes. Considering the fact that most of the eggs I used in my baking/cooking were bought from supermarket, this batch from the wet market was indeed different. They were much larger in size and the yolks were of a much fresher and brighter colour. It also gives the cake a really fragrant eggy smell when it is done. Love it! Nothing beats fresh and premium ingredients.

Will be trying out more versions of the Swiss Roll next. I think they make pretty good breakfast items as well as after-dinner dessert.


**********

Recipe: Adapted & modified from Ochikeron.
Free printable version of recipe - Click here 

Ingredients

Sponge Cake
Eggs (separate the yolks from the whites) - 4 nos
Milk - 40g
Corn Oil - 40g
Vanilla Bean Paste - 1/4 tsp
Flour (sifted) - 60g
Castor Sugar - 80g

Filling
Whipping Cream - 200ml
Castor Sugar - 1 tbsp
Assorted fruits of your choice (diced)
* I used kiwi, strawberries, raspberries and mangoes

Method

Sponge Cake

1. Preheat oven to 180C. Line baking tray with baking paper.

2. In a large bowl, beat egg yolks together with milk, oil and vanilla. Mix well.

3. Add in flour and fold it into the yolk mixture using a spatula. Ensure mixture is well combined and smooth. Once combined yolk mixture is done, set aside for later use.

4. In a separate mixer bowl, beat the egg whites until foamy using an electric mixer.

5. Then gradually add in sugar and continue mixing until thick and stiff peak.

6. Once it is done, fold in egg white mixture, one-third portion at a time, into yolk mixture until a well-combined batter is obtained.

7. Pour combined batter into baking tray and ensures that it is evenly spread out.

8. Tap baking tray against tabletop to remove air bubbles from batter.

9. Bake in oven at 180C for about 12 mins or until cake is lightly browned.

10. When cake is done, remove from oven and tap baking tap against tabletop to prevent shrinkage.

11. Remove sponge cake from tray and allow it to cool on cooling rack. Ensure cake is completely cooled before adding filling on the browned side of the cake.

Filling

12. To prepare the filling, combine whipped cream with sugar using electric mixer. Beat until soft peak.

13. Spread cream filling over the browned surface of the cake.

14. Top with diced fruits over the creamed surface. Leave a one-inch gap around the border.

15. Roll the cake in baking paper and cover with a layer of cling wrap. Rest the cake in fridge for at least 2 hours before slicing and serving. Best served chilled.


Sunday, 20 March 2016

#50 - Raspberry & Apricot Crumble Cake

Yum

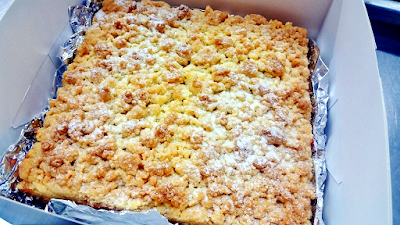
This is a recipe I learnt recently from a baking class at Phoon Huat. Crumble Cake, also known as the crumb cake, is the perfect cake to go with your coffee in the morning. In my opinion, for a crumb cake to be good, the proportion of the crumbs to the cake is very important and this recipe just hit it for me. If  I have to change something, I would probably replace the icing sugar in the streusel topping with brown sugar instead. That would give it a better sweetness and colour to the top. 

Although the recipe uses frozen raspberry and apricot, feel free to substitute that with a whole range of fresh fruits strawberries, peaches etc.) that you can choose from. The fresh fruitiness will be one of the kick for this crumb cake. 


***************

Recipe: Adapted & modified from Chef Patrick (Phoon Huat).

Ingredients

Sugar Dough Pastry (Base)
Unsalted Butter (softened) - 125g
Caster Sugar - 62g
Egg - 30g
Plain Flour - 180g

Strussel Topping
Unsalted Butter (softened) - 100g
Icing Sugar - 40g
Ground Almond- 40g
Plain Flour - 150g
Baking Powder - 1/2 tsp

Almond Butter Filling
Unsalted Butter - 125g
Caster Sugar - 80g
Eggs - 2nos
Plain Flour - 65g
Ground Almond - 80g
Vanilla Extract - 1/2 tsp

Strawberry Jam - 5 tbsp
Raspberry (frozen) - 80g
Apricot (frozen) - 80g


Method

Sugar Dough Pastry (Base)
1. In a mixing bowl, cream butter and sugar together.


2. Fold in the egg and ensure that mixture is well mixed.

3. Add in flour to the mixture and combine to form a dough.

4. Once dough is formed, cover with cling wrap and rest it in the fridge for 40 minutes.

Streusel Topping
5. In a large bowl, combine all the ingredients, butter, icing sugar, ground almond, plain flour and baking powder.


6. Using rubbing method, rub & mix all the ingredients together until they are well-combined into a crumble texture.

7. Set aside for later use.

Almond Butter Filling
8. In a mixing bowl, cream butter, sugar and vanilla extract together until a creamy texture is obtained.


9. Add in eggs (one at a time) to the mixture and ensure it is well mixed.

10. Gradually add in the flour and ground almond and mix well.

11. Set aside for later use.

12. Preheat oven at 170C.

13. Remove sugar dough from fridge. Using a rolling pin, roll the dough to 1/2cm thick and cut out to the shape of the square mould.

14. Place the sugar dough cut-out in the mould.

15. On the sugar dough in the mould, spread a thin layer of strawberry jam followed by half portion of the almond butter filling.

16. Lay the raspberry and apricot on top.


17. Spread the remaining amount of almond butter filling on top of the fruits before sprinkling the streusel topping on top.

18. Bake the cake at 170C for 45 minutes or until cake tester come out clean when inserted into the centre of the cake.


19. Remove cake from oven and allow it to cool slightly while it is still in the mould. Dust with some snow powder or icing sugar before serving. 


Monday, 4 January 2016

#45 - No-Bake Baileys Chocolate Biscuit Cake

Yum


My first bake of the year 2016! No-Bake Baileys Chocolate Biscuit Cake. Chocolatey rich & simply irresistible. A slice of simple goodness. I simply love the slight tint of Baileys within the biscuit cake. Such a sweet & delicate flavour and it goes perfectly well with the rich & creamy chocolate ganache. I am so going to dig into another slice right now!

How about you? If you are looking for a twist to your usual decadent but boring chocolate cake? Try this! The crunch coming from the digestive biscuit base along with the nutty flavour from the almond and pistachios nuts - Yummy! Not to mention, my favourite of them all - The deliciously rich & creamy chocolate ganache on the top of the biscuit cake! Yummy Yummy Yummy!


From other similar recipes online, you will realise that many others also made similar version of this cake using Marie Biscuits instead. But personally, I prefer the crunch of the digestive biscuits in this case and feel that it goes really well with the pistachios nuts. It is a matter of personal preference I guess. 


To be honest, I wasn't counting on this recipe to be a huge success due to its simplicity. But to my surprise, it is really well-received in my family and even I (not much of a sweet tooth) enjoys the rich and creamy chocolate ganache alongside with the nutty biscuit cake base. You got to try it to believe it!

***************

Recipe: Adapted & modified from Home Cooking Adventure.


Ingredients

Biscuit Cake Base
Mixed Nuts - 100g (I used 50g almonds & 50g pistachios)
Digestive Biscuits - 800g

Chocolate Syrup
Fine Sugar - 180g
Cocoa Powder - 60g
Baileys Irish Cream - 50ml
Milk - 200ml
Unsalted Butter (softened) - 150g
Vanilla Extract - 1tsp

Chocolate Ganache
Whipping Cream - 120ml
Bittersweet Chocolate (chopped) - 120g


Method


1. Grease and line cake pan (spring form pan, round, 23cm) with baking paper. Set aside for later use

2. In a saucepan, over medium heat, toast the mixed nuts for 5 minutes. Stir frequently to ensure even toasting. Set aside for later use.


3. Break digestive biscuits into small pieces in a large bowl.


4. Add in mixed nuts (Step 2) to the digestive biscuits (Step 3). Mix well.


5. In a saucepan, combine sugar, cocoa powder and milk together. Mix well to ensure that the mixture is well-mixed.


6. Place saucepan over medium heat. Add in butter and bring mixture to a boil while stirring constantly.


7. Remove from heat and add in Baileys and vanilla extract. Mix well and allow chocolate syrup mixture to cool for at least 15 minutes.

8. Once chocolate syrup is cooled, pour it over cake base mixture (Step 4) and ensure they are well-combined.


9. Transfer combined cake base mixture into cake pan and press down firmly using spatula (or back of a spoon).

10. Cover with cling wrap and refrigerate for 1 hour.

11. After 1 hour, heat whipping cream in a saucepan over medium heat until it starts to boil.

12, Pour hot cream over chopped chocolate and stir well.

13. Remove cake from refrigerator and pour chocolate ganache over cake.

14. Refrigerator chocolate biscuit cake overnight before serving. 


Wednesday, 27 May 2015

#36 - Baileys Butter Cake

Yum


Couple of months back, I was staring at my display cabinet at home and was left wondering. 

How on earth did Hubby & myself end up with these bottles and bottles of lovelies at home? We are running out of space in the display cabinet to store them. We always seems to buy them faster than we can consume them. Sure, leaving them in the cabinets is pretty, but isn't it such a waste? What can we ensure we put them to better use?


Other than the obvious choice of drinking them all up (since hubby & myself are not exactly heavy drinkers), what else can I do to make them into good use? Baking, it shall be. With that in mind, I went on my search of a simple nice recipe to incorporate alcohol in my baked goods. And I found it! 


Butter cakes. There is just something very enticing about these simple beauties. They are not as fanciful and elaborated like layered cakes, and neither are they as pretty and versatile like our cupcakes. But then again, when they are done right, butter cakes are our plain old simple solution at all times. It is also the cake to go along with a nice hot cup of coffee on a Sunday morning while reading your newspaper. Am I not right?


To this simple beauty, let us add in our Baileys Irish Cream! Personally, Baileys has always been one of my top 3 choice of drink when i am out with the girls. This is especially so when I am not exactly in a mood for strong drinks. There is something about the creamy & milky texture that reminds me of a iced chocolate drink and who doesn't fancy a iced chocolate drink at anytime of the day?


With that in mind, I was off to give the recipe a shot! 

In 2 weeks, I baked this butter cake twice and feedback from family and friends have been relatively positive. My Dad and & Mum (who does not even drink much alcohol) love the cakes (and commented an improvement on my baking skills) and even my mother-in-law (who is definitely well-versed in the culinary department) gave me a thumb up! It makes me really happy to be able to make them happy with my limited culinary skills. They are my motivation. Haha!

If I were to change anything in this recipe, I would probably cut down on the amount of cocoa powder used and to increase on the amount of Baileys in the batter. That would give the butter cake a more distinct flavour to it, I believe. 


Look at this simple slice of Baileys Butter Cake. I am so drawn to it because of its pretty marbly swirls.


For those of you who are interested to try out this recipe I am sharing, I am pretty sure that you would like to achieve these pretty swirls in your cake, isn't it? Just make sure you do not go overboard with your obsession of swirling in the batter. In fact, the technique I have used here is not exactly marble swirling. Instead, we make use of the technique in "Zebra Cakes" to achieve this result which I really like very much. 

In Step (9) of the recipe when you are alternating between the vanilla & cocoa batter, you may want to tap/shake the load pan very very lightly from left to right. This is just to help the batter to spread out better towards the side of the loaf pan. This will be useful as the vanilla batter can be a little bit on the thick side. When in the loaf pan, do not mix the vanilla & cocoa batter together. I not even swirl it further. Fear not, even if the batter looks ugly like what I have shown below. 

My First Try
My Second Try
The thing about creating cakes with interior designs is that you have absolutely no idea whether your attempt is successful until you cut into it. It took me so much self-control to stop myself from cutting into the cake on the night of completing the cake. While waiting for it to cool overnight, I could only keep my fingers crossed and pray that it will turn out exactly how I want it to be. 

Looking at the results, I am so glad that I have waited. It was much easier to get near and clean slices of the cake after it has been cooled overnight. 

My First Try
My Second Try

To me, the best part of my love in baking is to be able to share the fruits of my labour with my family and friends and it is such an added bonus if they like what I am making of them. Sharing is caring! 


***************

Recipe: Adapted & modified from here (Connie Goh).

Ingredients
250g Salted Butter, softened
170g Castor Sugar
4 Eggs
220g Self Raising Flour, sifted
20g Cocoa Powder, sifted
4 tbsp Baileys Irish Cream (Caramel Flavour)
3 tbsp Milk
1 tsp Vanilla Extract

Method
1. Preheat oven to 150C.

2. Grease loaf pan before lining with baking paper. Set aside for later use.

3. Add cocoa powder to Baileys and mix well. Set aside for later use.

4. In a mixer bowl, cream butter together with sugar until pale in colour.


5. Add in vanilla extract and milk to the mixture and mix well.

6.. Add in the eggs (one at a time), mixing well after each addition.

7. Fold in the sifted flour to the wet mixture, one third portion at a time and mix well until batter is smooth.

8. Divide cake batter into 2 portions. Stir in Baileys mixture in Step (3) into one portion of the cake batter.

9. Using a spoon or a spatula, spoon in the vanilla cake batter and Baileys cake batter into the loaf pan alternatively. Tap the loaf pan on the work surface lightly as you go along to ensure batter is evenly spread out and any air pockets within it are removed.

10. Bake the cake at 150C for 45 minutes and 160C for 20 - 25 minutes or until cake tester come out clean when inserted into centre of the cake. 


11. Remove from the oven and allow the cake to cool in the loaf pan for 10 - 15 minutes, before transferring it to the wire rack to be cooled completely.


Friday, 20 March 2015

#30 - Banana Loaf with Streusel Topping

Yum


I have always love baking with different types of fruits and one of my favourite has got to be bananas! The sweetness of this fruit is good for cake, muffins, bread and it even goes well with peanut butter in a sandwich. My mum has always been a great lover of banana bread and since young, I have kind of pick up on this love of hers and there is no way I can resist a soft and fragrant piece of banana cake/bread. 


In my kitchen, I always seems to have a couple of overripe bananas on the counter top every now and then and it's strange how excited I get when I see them turning dark and black. And why is that so, you asked? Simply because the darker they get, the sweeter they are and that make them so PERFECT for baking! 

For this particular recipe of Banana Loaf with Streusel Topping I am sharing, you got to love the topping as well! Trust me on that. The topping is crumbly and sweet and it goes perfectly well with the soft banana bread. Not to mention, I simply adore the combination of brown sugar with butter! On the other hand, if you are not such a huge fan of Streusel Topping, you may replace it with a cream cheese frosting and it will taste just as good! 

The loaf itself is loaded with banana and that definitely helps to ensure that the loaf remains moist and rich! 

I just love it when my kitchen is filled with the smell of freshly baked Banana Bread. Don't you?


***************

Ingredients
2 cups All Purpose Flour
1 1/2 tsp Baking Powder
1/2 tsp Baking Soda
1/4 tsp Salt
1/2 tsp Cinnamon
1 1/2 cups Mashed Banana (about 3 medium size bananas)
2 Eggs
3/4 cup Fine Sugar
1/2 cup (113.5g) Butter, room temperature
1 tsp Vanilla Extract

Streusel Topping
1/4 cup Brown Sugar
3 tbsp All Purpose Flour
2 tbsp (28.4g) Butter


Directions
1. Preheat oven to 180C. Grease and line loaf pan with non-stick cooking spray and baking paper. Set aside for later use. 

2. To prepare the streusel topping, combine the brown sugar and flour in a small bowl. Using a pastry blender or a fork, cut in the cold butter until coarse crumbs are obtained. Refrigerate the streusel topping until it is ready to use.


3. Sieve the dry ingredients (flour, baking powder, baking soda, salt and cinnamon) together and set aside. 

4. In a mixing bowl, mashed the bananas using a fork until you get a thick mash of banana. 

5. To the mashed banana, add in the eggs, sugar, butter and vanilla extract. Whisk these ingredients together using a whisk until they are well combined and a thick mixture is obtained. 

6. Make a well in the middle of the dry ingredients in Step (2) and add in the wet ingredient in Step (4). Mix well using a whisk / spatula. Make sure that the combined mixture is well-mixed, with no trace of flour.


7. Pour the creamy batter into the loaf pan. Using a butter knife, run the knife through the batter a few times so as to remove any air bubbles.


8. Remove streusel topping from refrigerator and sprinkle them on the top of the batter evenly.


9. Bake for 45 to 55 minutes, or until toothpick when inserted comes out clean.


Related Posts Plugin for WordPress, Blogger...