Showing posts with label Fruits. Show all posts

Wednesday, 11 January 2017

#54 - Fruity Swiss Roll

Yum

Start of a new year, 2017!

I know I was not baking much for last year and this year, I hope to set things right! I really hope to keep to my resolution of uploading one recipe a week. Baking and sharing recipes are things I do to keep myself sane amidst my work and other chores. It is like a personal me-time. Since I enjoy these times so much, I promised myself that I shall work much harder to keep to this resolution of mine this year. I hope, I really hope so.

This is the second week of the year and I am starting my year with a Fruity Swiss Roll bake. I bought some really fresh good eggs from the wet market the other day and I was excited to use them in my bakes. Considering the fact that most of the eggs I used in my baking/cooking were bought from supermarket, this batch from the wet market was indeed different. They were much larger in size and the yolks were of a much fresher and brighter colour. It also gives the cake a really fragrant eggy smell when it is done. Love it! Nothing beats fresh and premium ingredients.

Will be trying out more versions of the Swiss Roll next. I think they make pretty good breakfast items as well as after-dinner dessert.


**********

Recipe: Adapted & modified from Ochikeron.
Free printable version of recipe - Click here 

Ingredients

Sponge Cake
Eggs (separate the yolks from the whites) - 4 nos
Milk - 40g
Corn Oil - 40g
Vanilla Bean Paste - 1/4 tsp
Flour (sifted) - 60g
Castor Sugar - 80g

Filling
Whipping Cream - 200ml
Castor Sugar - 1 tbsp
Assorted fruits of your choice (diced)
* I used kiwi, strawberries, raspberries and mangoes

Method

Sponge Cake

1. Preheat oven to 180C. Line baking tray with baking paper.

2. In a large bowl, beat egg yolks together with milk, oil and vanilla. Mix well.

3. Add in flour and fold it into the yolk mixture using a spatula. Ensure mixture is well combined and smooth. Once combined yolk mixture is done, set aside for later use.

4. In a separate mixer bowl, beat the egg whites until foamy using an electric mixer.

5. Then gradually add in sugar and continue mixing until thick and stiff peak.

6. Once it is done, fold in egg white mixture, one-third portion at a time, into yolk mixture until a well-combined batter is obtained.

7. Pour combined batter into baking tray and ensures that it is evenly spread out.

8. Tap baking tray against tabletop to remove air bubbles from batter.

9. Bake in oven at 180C for about 12 mins or until cake is lightly browned.

10. When cake is done, remove from oven and tap baking tap against tabletop to prevent shrinkage.

11. Remove sponge cake from tray and allow it to cool on cooling rack. Ensure cake is completely cooled before adding filling on the browned side of the cake.

Filling

12. To prepare the filling, combine whipped cream with sugar using electric mixer. Beat until soft peak.

13. Spread cream filling over the browned surface of the cake.

14. Top with diced fruits over the creamed surface. Leave a one-inch gap around the border.

15. Roll the cake in baking paper and cover with a layer of cling wrap. Rest the cake in fridge for at least 2 hours before slicing and serving. Best served chilled.


Saturday, 27 August 2016

#51 - Rainbow Popsicles

Yum

You know that it is summer time when you are craving for something icy cold and refreshing like these homemade popsicles! Yay to homemade goodies! Don't you just love homemade food like I do? The beauty of these homemade goodies are that they are free from sugars and artificial flavourings. You don't even have to worry about additional colourings or chemicals being added. These rainbow popsicles are made with just fruits and nothing else! Isn't it just great!


These popsicles are so easy to make that I am sure you will enjoy making them as much as you enjoy eating them!

I simply love how pretty these little things look! To make these pretty yummies, you need nothing more than different types of fresh fruits and a blender. That's it! You can also get creative by arranging the layers of fruits puree in any order you prefer. 

What are you waiting for? Head straight into your kitchen and make some of these pretty rainbow popsicles now! 

***************

Recipe: Adapted and modified from here
Free printable version of recipe - Click here

Servings
8 Popsicles (depending on size of the mould)

Ingredients
Strawberries (blended) - 200g
Oranges (blended) - 200g
Pineapples (blended) - 200g
Kiwis (blended) - 200g
Blueberries (blended) - 200g

(Optional)
Coconut Water -1 to 2 Tbsp


Method
1. For each of the different coloured fruits layers (red - strawberries, orange - oranges, yellow - pineapples, green - kiwis, blue - blueberries), place the fruits in the blender and blend until a smooth puree is obtained. Remember to wash the blender thoroughly before blending the next layer. 


2. For fruits like the pineapples and blueberries, you may wish to add in 1 to 2 tbsp of coconut water to allow smoother blending of the puree. 


3. Distribute the different coloured fruits puree evenly into the popsicles mould, layer by layer. 

4. Freeze the popsicles for at least 6 hours (or overnight) until the popsicles are firm. 

5. To remove popsicles from their moulds, dip moulds in glass of water for 10 seconds. This will ensure the popsicles come out smoothly from the moulds. Serve while popsicles are firm. 


Sunday, 20 March 2016

#50 - Raspberry & Apricot Crumble Cake

Yum

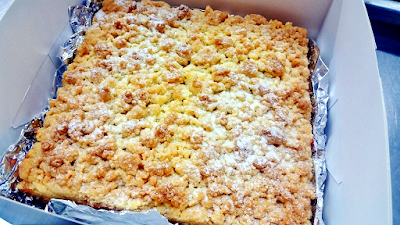
This is a recipe I learnt recently from a baking class at Phoon Huat. Crumble Cake, also known as the crumb cake, is the perfect cake to go with your coffee in the morning. In my opinion, for a crumb cake to be good, the proportion of the crumbs to the cake is very important and this recipe just hit it for me. If  I have to change something, I would probably replace the icing sugar in the streusel topping with brown sugar instead. That would give it a better sweetness and colour to the top. 

Although the recipe uses frozen raspberry and apricot, feel free to substitute that with a whole range of fresh fruits strawberries, peaches etc.) that you can choose from. The fresh fruitiness will be one of the kick for this crumb cake. 


***************

Recipe: Adapted & modified from Chef Patrick (Phoon Huat).

Ingredients

Sugar Dough Pastry (Base)
Unsalted Butter (softened) - 125g
Caster Sugar - 62g
Egg - 30g
Plain Flour - 180g

Strussel Topping
Unsalted Butter (softened) - 100g
Icing Sugar - 40g
Ground Almond- 40g
Plain Flour - 150g
Baking Powder - 1/2 tsp

Almond Butter Filling
Unsalted Butter - 125g
Caster Sugar - 80g
Eggs - 2nos
Plain Flour - 65g
Ground Almond - 80g
Vanilla Extract - 1/2 tsp

Strawberry Jam - 5 tbsp
Raspberry (frozen) - 80g
Apricot (frozen) - 80g


Method

Sugar Dough Pastry (Base)
1. In a mixing bowl, cream butter and sugar together.


2. Fold in the egg and ensure that mixture is well mixed.

3. Add in flour to the mixture and combine to form a dough.

4. Once dough is formed, cover with cling wrap and rest it in the fridge for 40 minutes.

Streusel Topping
5. In a large bowl, combine all the ingredients, butter, icing sugar, ground almond, plain flour and baking powder.


6. Using rubbing method, rub & mix all the ingredients together until they are well-combined into a crumble texture.

7. Set aside for later use.

Almond Butter Filling
8. In a mixing bowl, cream butter, sugar and vanilla extract together until a creamy texture is obtained.


9. Add in eggs (one at a time) to the mixture and ensure it is well mixed.

10. Gradually add in the flour and ground almond and mix well.

11. Set aside for later use.

12. Preheat oven at 170C.

13. Remove sugar dough from fridge. Using a rolling pin, roll the dough to 1/2cm thick and cut out to the shape of the square mould.

14. Place the sugar dough cut-out in the mould.

15. On the sugar dough in the mould, spread a thin layer of strawberry jam followed by half portion of the almond butter filling.

16. Lay the raspberry and apricot on top.


17. Spread the remaining amount of almond butter filling on top of the fruits before sprinkling the streusel topping on top.

18. Bake the cake at 170C for 45 minutes or until cake tester come out clean when inserted into the centre of the cake.


19. Remove cake from oven and allow it to cool slightly while it is still in the mould. Dust with some snow powder or icing sugar before serving. 


Wednesday, 5 August 2015

#40 - Toasted Peanut Butter & Banana Sandwich

Yum

Coming back to the scene after taking a 2 months break from food blogging is not easy. You just find it that much harder to get the momentum going. One day I can be super gung-ho, going through sites and books on recipe ideas, but another day I just feel like chucking them all aside, refusing to take a second look at the number of "backlog" recipes I have on hand. 

It is not that I do not enjoy being in the kitchen, snapping pretty pictures of the end products and sharing them with everyone, but I just can't seem to find that motivation for the longest time. But hey, I am back! That's all that matters isn't it?

During this short break, I actually spent more time catching up with friends, put in more hours in my teaching job and more important, I spent more time with myself. I want to believe that I am now stronger and I kind of appreciate life better, as what it is. As cache as it sounds, everything does happen for a reason right? Right.


Back to food blogging. Although I have not been baking/ cooking much lately, one thing that I do engage in on a daily basis (or at least I try to make it 3-4 times a week) is Breakfast Preparation! I do up these breakfast boxes for my hubby so to make sure he has a decent breakfast and he gets all the energy he needs for his work. As such, I am constantly on the lookout for  quick, fuss-free and yummy breakfast ideas. Be it a simple recipe for Tuna Melts (with a twist in adding  cottage cheese and dill) or 20 ways to incorporate colours in your breakfast, count me in! 


And this week, I tried out the warm and sweet Toasted Peanut Butter & Banana sandwich. It is such a yummy alternative to its more popular counterpart, P&J sandwich. Make sure your bananas have really ripen before you do this okay. The nuttiness of the peanut butter goes so well with the sweetness of the bananas. No additional butter or spread needed at all. To add on to the flavour, I added a dash of cinnamon powder over the bananas and YUM! The fragrance of the cinnamon powder just elevated the sandwich to another level. 


This is so simple and fuss-free and you can easily fix this up in like 15 minutes? So why not give this a try tomorrow morning. There! You have something to look forward to for tomorrow already! 

Good day everyone!


***************

Servings
2 Sandwiches

Ingredients
4 slices of Wholemeal Bread
2 tbsp Peanut Butter
2 Banana, sliced
1/4 tsp Cinnamon Powder

Directions
1. Spread peanut butter evenly onto one side of each slice of bread.

2. Using air fryer, toast the bread at 180C for 3 - 5 minutes until it is lightly browned. 

3. Remove bread from air fryer and place banana slices onto the peanut buttered side of one slice of bread. 

4. Dust lightly with cinnamon powder. Top with the other slice of bread and press together firmly. 

5. Serve while warm. 


Saturday, 13 June 2015

#39 - Honey Lemonade Popsicles

Yum

Just what I need to beat the heat outside! Are you frustrated with the recent hot weather like I am? I am sure we are all craving for something cold, cooling and yummy to bring the heat down a little. Try this! This is one of my favourite popsicle flavour so far. Sweet & tangy all at the same time! 


My hubby loves this recipe so much that he is constantly bugging me to make more these beautiful little things. The only thing he hates about them is the waiting time. Having to wait overnight while they freeze up is such a torture. What can I say? Good things are worth waiting for, aren't they?


The best part of this popsicle is that you are not restricted by the choice of fruits. You do not have to use the fruits I recommended. You may replace it with other fruits that you preferred (eg. oranges, peaches, mangoes etc). It is the magical blend between the honey and the lemonade that gives you the sweet yet tangy taste that is so addictive! 

I am so heading into my kitchen and making another batch of this NOW!  

***************

Recipe: Adapted and modified from here

Servings
6 Popsicles (depending on size of the mould)

Ingredients
3/4 cups Water
4 Tbsp Honey
1/2 cup Lemon Juice
Zest of 2 Lemons
1 Kiwi, sliced
2 - 4 Strawberries, sliced
12 Blueberries

Method
1. Combine water, honey, lemon juice and lemon zest in a liquid measuring cup. Stir well to ensure that the honey is fully dissolved into the lemonade. 


2. Distribute the fruits (kiwi, strawberries and blueberries) among the popsicles moulds. 


3. Pour lemonade mixture into the popsicles moulds. 


4. Freeze popsicles for at least 6 hours (or overnight) until the popsicles are firm. 

5. To remove popsicles from their moulds, dip moulds in glass of water for 10 seconds. This will ensure the popsicles come out smoothly from the moulds. Serve while popsicles are firm. 


Saturday, 7 March 2015

#28 - Mango Sago with Pomelo, 杨枝甘露

Yum


Mango Sago with Pomelo, better known as 杨枝甘露, a very popular dessert in Singapore. Somehow, this also happens to be the one dessert that I make year after year (after each Lunar New Year). Maybe it is because of my hubby's love for mangoes, or maybe it is just due to the abundance of pomelo I have at home after each Lunar New Year. Whatever it may be, there is no reason not to indulge in this sweet yet tangy dessert, especially in the hot and humid weather these days.


The only problem I have with this dessert item is having to seek for really ripe and sweet mangoes. Last year when I was making this dessert, I did not manage to find the type of mangoes I was looking for and had to settle for whatever I could find at the local supermarket. I ended up with these mangoes which were SO sour that it kind of spoilt the whole dessert for me. 

This time round, I managed to find these honey mangoes from Thailand instead. Although they were still slightly sour, but overall, they were much better. Furthermore, with the generous helpings of pomelo and creamy sago in the dessert, it was just heavenly! 

On the recipe for this dessert item, you would probably realised that for most of the recipes circulating on the internet, it is most common to have a mixture of the sago pearls, pomelo, evaporated milk/cream within the mango puree itself. However, I like mine slightly different. I separated the mango puree from the creamy sago (totally fattening I know, but yummy!) before I top up the dessert with a generous helping of mayo cubes and pomelo. Not only does that looks prettier, the creamy sago provides a smooth and rich texture to the dessert that I totally love! 


***************

Recipe: Adapted & modified from here.

Servings
6 - 8

Ingredients
Mango Puree Mixture
2 medium size ripe mangoes, cubed
500 ml mango juice
150 ml evaporated milk

Creamy Sago
60 grams sago pearls
200 ml Kara Coconut Cream
1/4 C dairy cream (35% fat)

Toppings
Pomelo, peeled and sacs separated
1 medium size ripe mango, cubed


Directions
1. In a saucepan of boiling water, add the sago pearls. Let it boil for 10 minutes before lowering the heat and continue to simmer until the it turns totally transparent. Strain the sago pearls through a sieve and run it under cold running water. Drain and set aside.


2. Mix the ready sago pearls with coconut cream and dairy cream. Keep it chilled in the fridge for later use.


3. To prepare the mango puree mixture, blend the mango cubes with mango juice and evaporated milk  with a blender on high speed. Make sure all the ingredients well incorporated in the mixture. When mixture is ready, set aside in the fridge for later use.


4. When ready to serve, layer the mango puree mixture at the bottom, followed by the creamy sago and lastly, top the dessert with some mango cubes and pomelo sacs according to your personal preference.

Note: Alternatively, you may also omit the use of creamy sago, and simply add the sago pearls to the mango puree mixture, mix everything thoroughly before serving.


Related Posts Plugin for WordPress, Blogger...