Showing posts with label Breakfast. Show all posts

Thursday, 1 September 2016

#52 - Honey Bread Loaf

Yum

If you are looking for a bread recipe that does not require butter, egg or even milk, you have found it! This is the soft & yummy Honey Bread Loaf that I always turn to when I am running out of ingredients in my pantry. This recipe is so easy that even a beginner will have no problem with it at all.


The bread you will get is slightly sweet (not too sweet) and you will be able to taste the honey but it is not overpowering at all. Fresh or lightly toasted, the bread taste just as good!

***************

Free printable version of recipe - Click here

Ingredients
Water – 220g
Raw Honey – 60g
Caster Sugar – 20g
Salt – 5g
Bread Flour, sifted – 375g (up to 2 tbsp more, if necessary)
Yeast – 6g
Corn Oil – 20g

Method
1. Pour water into the bread barrel.

2. At each corner of the bread barrel, add in honey, sugar and salt.

3. Add in bread flour on top of the wet ingredients. Make sure the wet ingredients are well covered by the flour.

4. In the center of the flour heap, make an indentation and add in the instant dry yeast. Cover up the yeast with the flour.


5. Secure bread barrel in the bread machine.


6. Select "Custom Procedure" function on your bread machine (On my Donlim T15A Breadmaker, I selected function "21") and input the following settings before selecting "Start".

First kneading - 20 minutes
First proofing - 1 hour
Second kneading - 30 minutes
Second proofing - 1 hour
Baking - 1 hour


7. 10 minutes after first kneading, you should see the dough being formed. Add in corn oil at this stage before continuing the process. Keep an eye on the kneading of the dough. You may add in more bread flour (up to 2 tbsp) to achieve the right consistency (dough should not be sticking to the bottom/side of bread barrel)


8. After second kneading (before the dough undergoes second proofing), paused the machine and remove the kneading blade from bread barrel. Continue with second proofing and baking.
9. When bread is ready, remove bread barrel from the machine immediately. 

12. Transfer the bread to cooling rack to allow it to cool completely before slicing and serving. 


Monday, 22 February 2016

#48 - Chicken with Mushroom Sandwich

Yum


It has been a long weekend for me. I was actually sick over this last weekend and as a result, I had to cancel/postpone all my work commitments so that I could get some rest at home and focus on recovering soon. 

But as always, whenever I have the full day to myself at home (and this time it was 2 full days), I just could not stay out of the kitchen. I know I am such a contradicting person but it seems like baking/cooking has a healing effect on me. 

This was a really well-spent weekend for me. Not only did I get some rest (away from work), I also managed to accomplish trying out many food items on my To Bake/Cook List. I am so excited to share these recipes with all of you on MMC. I promise, you will soon see the following recipes coming up on MMC. 
  1. Peanut Butter Bread
  2. Stir Fry Celery with Pork
  3. Lemon Butter Chicken & Rice (One-Pot)
  4. Pineapple-Berry Lemonade Popsicles
  5. Bailey's Ice Cream
  6. Tuna Salad Burritos
  7. Laksa Fried Rice

Another good thing about a well-spent weekend is that you will wake up on a Monday morning, feeling great about the start of the week ahead. This was exactly how I felt this morning! 

To kick start the week ahead, I decided to put in a little more work into this morning's breakfast and this was what I came up with - Chicken with Mushroom Sandwich. Mind you, I added a little bit of wine into this recipe and the result was EXCELLENT. The splash of wine really built up the flavour and its fruity taste goes really well with my favourite, mushrooms! 


I feel so satisfied now(and ready for the rest of the day) after such a hearty and tasty sandwich! I totally see myself making more of such sandwiches very soon and in my next try, I am already decided that I shall be adding some cheese to go along with this recipe. Imagine the cheesy goodness together with the mushroom and chicken. Wow! 

***************

Recipe: Adapted & modified from Pass the Sushi

Servings
2 Sandwiches (4 slices)

Ingredients
Chicken Thighs (2 pieces)
Garlic Salt (to taste)
Black Pepper (to taste)
Butter (1tbsp)
Corn Oil (1tbsp)
Onion, chopped (50g)
Garlic, chopped (35g)
Mushroom, sliced (90g)
Cherry Tomatoes (5 nos)
Wine, of your choice (2 tbsp)
Chicken Stock (2 tbsp)

Directions
1. Season chicken thighs with garlic salt and black pepper to taste.


2. In a saucepan over medium heat, add in butter. Sear chicken (on both sides), skin-side down until golden brown. Transfer to a plate.


3. Once chicken has cooled down, shred it into pieces. Set aside. 

4. Add corn oil to the saucepan and lower heat to medium. Cook onion and garlic until they are fragrant. Stir well.


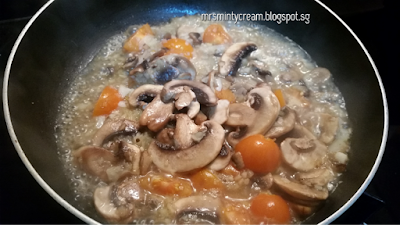
5. Add in mushroom and cherry tomatoes and cook for 5 minutes until they soften.


6. Add in wine and chicken stock before seasoning with salt and pepper. Cook for another 1 to 2 minutes. Set aside.


7. Lightly butter the bread. Using air fryer, toast the bread at 160C for 2 to 3 minutes until it is lightly browned. 

8. Remove bread from air fryer and start assembling the sandwich with the shredded chicken (Step 3) and mushroom mixture (Step 6).


9. Serve warm. 

Friday, 29 January 2016

#46 - Yakult Bread with Cornflakes

Yum

Look at this loaf of bread, isn't the colour beautiful? I still remember that morning of me waking up to this loaf of homemade bread, with colours just like the bright and cheery sunshine. I just love it! 

This is a really simple recipe which replaces the use of milk with my childhood favourite drink, Yakult! If you are in love with this drink like I am, try this recipe! Personally. I only wish that I could add even more yakult to this bread. To me, the stronger the yakult taste, the better! 


Not forgetting the crunchy cornflakes that come along with the bread. If you are as greedy as I am, you may want to consider serving the bread like I did, with a thin layer of butter/ peanut butter, topped with yet another layer of cornflakes! Yummy!

***************

Recipe: Adapted & modified from Everybody Eats Well in Flanders

Ingredients
Yakult (Original Flavour)- 250ml

Caster Sugar - 20g
Salt - 7g
Blue Jacket Bread Flour - 350g (and 2 tbsp more, if necessary)
Instant Dry Yeast - 7g
Unsalted Butter (softened) - 35g
Some cornflakes (crushed)
Egg Wash (1 egg + 1 tbsp water)

Method
1. Pour yakult into the bread barrel.


2. At each corner of the bread barrel, add in sugar and salt.

3. Add in bread flour on top of the wet ingredients. Make sure the wet ingredients are well covered by the flour.

4. In the centre of the flour heap, make an indentation and add in the instant dry yeast. Cover up the yeast with the flour.

5. Secure bread barrel in the bread machine.

6. Select "Custom Procedure" function on your bread machine (On my Donlim T15A Breadmaker, I selected function "21") and input the following settings before pressing "Start".

First kneading - 20 minutes
First proofing - 1 hour
Second kneading - 30 minutes
Second proofing - 1 hour
Baking - 1 hour

7. 10 minutes for first kneading, you should see a dough being formed. Once the dough is formed, add in butter before continuing the process.

8. After second kneading (before the dough undergoes second proofing), paused the machine and remove kneading blade from the bread barrel.

9. Brush the top of the dough with egg wash and roll it over the crushed cornflakes.

10. Return dough to the bread machine for second proofing and baking.


11. When bread is ready, remove bread barrel from the machine immediately. 

12. After removing bread from bread barrel, transfer it to the cooling rack to allow it to cool completely before slicing and serving. 


Friday, 18 September 2015

#42 - Basic White Bread

Yum

The Basic White Bread, one of the first few recipe any home baker will make upon receiving their first bread machine. I am no exception, other than the fact that I was not able to get it right in my first few tries. Haha.

I have to be honest. The initial few tries was frustrating for me. I just could not get it right. Sometimes it was the incorrect proportion between the wet/dry ingredients, sometimes it was due to insufficient proofing (using standard mode in BM) and sometimes I just could not figure out what was the reason behind the failed attempts. Somehow the first few loaves of bread I have gotten out of the bread maker was just way too flat for my liking. I wanted something that was tall, light & fluffy. 

It was weird. I had no such problems when using the bread maker for kneading & proofing before shaping the dough & finishing off with baking in the oven (See my Cheesy Corn Pull-Apart Bread (#41)). It was just loaf bread that was giving me such a headache. 


After my 5th try, I finally managed to get a loaf of Basic White Bread which I was satisfied with. Thanks to this modified recipe as well as this really good Blue Jacket Bread Flour from Taiwan. I was finally able to get a decent height in my loaf and soft & fluffy too! 


I love having a good recipe for Basic White Bread on hand. This has allowed me to pair the white bread with its fanciful counterparts so to prepare different sandwich combos for my morning breakfast! It is so much fun. 


This is such a morale boast to me. I shall continue on this route of yielding taller, softer & yummier bread! 


***************

Recipe: Adapted & modified from Donlim Bread Maker Manual

Ingredients
Water - 190ml
Caster Sugar - 80g
Salt - 4g
Egg (beaten)- 1 no.
Milk Powder - 10g
Blue Jacket Bread Flour - 350g (and 2 tbsp, if necessary)
Instant Dry Yeast - 4g
Salted Butter (softened) - 40g


Method
1. Pour water into the bread barrel.

2. At each corner of the bread barrel, add in sugar, salt, beaten egg and butter.

3. Add in the milk powder and bread flour on top of the wet ingredients. Make sure the wet ingredients are well covered by the flour.

4. In the centre of the flour heap, dig a hole and add in the instant dry yeast. Cover up the yeast with the flour.


5. Secure bread barrel in the bread machine.


6. Select "Custom Procedure" function on your bread maker(On my Donlim T15A Breadmaker, I selected function "21") and input the following settings before pressing "Start".

First kneading - 20 minutes
First proofing - 1 hour
Second kneading - 10 minutes
Second proofing - 1 hour
Baking - 50 minutes

*After second kneading, paused the machine if you wish to remove the kneading blade from the bread barrel. Do this before the dough undergoes second proofing.

7. When bread is ready, remove bread barrel from the machine immediately. 


8. After removing bread from bread barrel, transfer it to the cooling rack to allow it to cool completely before slicing and serving. 


Saturday, 29 August 2015

#41 - Cheesy Corn Pull-Apart Bread

Yum

I have always wanted to own a breadmaker at home since I first started out in the kitchen. However, due to space constraint and fear of it being a white elephant, I was hesitant for a long period of time. But just last week, with much anticipation, I finally made the decision to purchase one and here I am, my first homemade bread product! 

Upon receiving the breadmaker, I was all excited to start making my own homemade bread. You have no idea how happy I was when the friends with whom I shared the bread with, simply love it! Of course, there are still plenty of room for improvement but I am so looking forward to trying out different bread recipes and making sure my house is filled with the fresh & sweet aroma of homebaked bread!


In this recipe, the combination of fresh corn kernels with parmesan cheese, along with a honey glaze on the top, gives you that sweet and salty balanced taste. The dough was kneaded by breadmaker before it was shaped and finished off with oven baking to yield a nice brown colour. Enjoy :)

***************

Recipe: Adapted & modified from My Mind Patch.

Servings
9 buns

Ingredients
Bread Dough
130g Corn Kernels, steamed (divided into 2 portions of 90g & 40g respectively)
80g Milk
20g Condensed Milk
40g Caster Sugar
1/4 tsp Salt
35g Egg, beaten
30g Salted Butter
130g Bread Flour, sifted
20g Cake Flour, sifted
3/4 tsp Instant Dry Yeast


Topping
75g Shredded Parmesan Cheese

Glaze
Beaten Egg
1 tbsp Honey, mixed with 1 tsp Hot Water


Method
1. Grease baking pan (I used 9"square pan, for better height of the buns, use a 7" or 8" square pan) by spraying a layer of non-stick spray around the base and side of pan before lining with baking paper. Set aside for later use.

2. Using fresh corn, collect corn kennels from corn cob and steamed at high heat for 15 minutes.


3. After corn kernels are slightly cooled, blend it (90g) with milk using a food processor or a blender. Make sure the mixture is well blended.


4. Pour corn mixture into a bowl. Add in remaining corn kernels (40g) and condensed milk. Make sure the combined mixture is well mixed.

5. Pour corn mixture into the bread barrel.

6. At each corner of the bread barrel, add in sugar, salt, beaten egg and butter.


7. Add in the bread flour and cake flour on top of the wet ingredients. Make sure the wet ingredients are well covered by the flour.

8. In the centre of the flour heap, dig a hole and add in the instant dry yeast.


9. Secure bread barrel in the bread machine.


10. Select "Knead Dough" function on your bread maker, and press "Start" (On my Donlim T15A Breadmaker, I selected function "9" and for 10 minutes - would suggest increasing kneading time to 20 minutes instead to yield a softer & fluffier bread texture).

11. When dough is ready, sprinkle some bread flour over the top of the dough and transfer it from bread barrel to a well-floured work surface.

12. Flatten the dough lightly to release the trapped air within the dough.

13. Divide the dough into 9 equal portions, about 63g to 65g each.

14. Lightly sprinkle each portion with some flour and roll it within your palms into a round ball. Place the dough buns into prepared baking pan.


15. Lightly spray some water over the dough buns before placing baking pan in a closed oven ("OFF" mode) to allow proofing of the dough for 90 minutes or when dough has risen to 1.5 times.


16.  After proofing, remove baking pan from oven. Preheat oven to 170C.


17. On the dough buns, brush a layer of beaten egg before placing the shredded cheese over the top.


18. Bake for 20 - 22 minutes, or until the cheese is partially melted & browned.


19. When bread is ready, removed from oven and apply layer of honey glaze on top immediately.

20. Allow bread to cool slightly and serve bread while it is still warm. 


Thursday, 21 May 2015

#35 - BEC Burger

Yum

I just made this yummy BEC Burger for my hubby this morning and he enjoyed it very much!

Bacon, egg and cheese burger (BEC Burger) is a popular breakfast choice in the United States. Instead of burger bun, it is also commonly assembled in a sandwich form or with a different choice of bread.

Many variations of this burger/sandwich also exist by substituting the choice of poultry (bacon / sausage / ham), choice of cheese (Swiss / cheddar) or even changing the ways of making the eggs (fried / scrambled). A pretty versatile item I would say.


This is definitely one breakfast item that I make pretty often and I especially turn to this recipe when my pantry is running low on supplies. The components needed are few and pretty basic in my opinion and that's a good thing! 


For my version of the BEC Burger, I like my burger bun to be buttery and toasted, and other than bacon, egg and cheese, I also like to add a little bit of Japanese Mayonnaise to it so as to provide a stronger flavour. If I have more components with me, I would also caramelised some onions or throw in some butter head lettuce to add more texture and crunch to the burger. If you ask me, with all the butter, bacon and cheese that go into this burger, it may not be the healthiest burger. But it goes without saying that this burger is good for either breakfast or brunch and is really satisfying in terms of its flavour!  

As with most sandwich / burger, this BEC Burger is best when served hot. 


***************

Serving
1

Ingredients
Burger Bun
Butter
Cheddar Cheese
Egg
Back Bacon
Japanese Mayonnaise 
Salt & Pepper, to taste
Parsley
Paprika


Method
1. Slice a hamburger bun into half, coat each side with some butter.


2. On one half of the bun, top with a slice of cheddar cheese and toast the two halves in an oven / air fryer. I used the air fryer and toasted both halves of the bun (with cheese on one of them) at 180C for 3-5mins. Keep an eye on the cheese slice. Once it has melted, removed toasted bun from the oven/air fryer. You should get a lightly brown crisp burger bun.

3. Using a saucepan over medium heat, fry the egg (sunny side up or over-easy, according to your desired preference). Season with salt, pepper, parsley and paprika. 


4. While that is being done, cook the bacon in the same saucepan until it crisp up. 


5. Remove egg and bacon from pan and you are ready to assemble the burger in your preferred order. My version - Bottom buttery toasted bun with melted cheese followed by cooked back bacon, top with sunny-side-up egg and a touch of Japanese Mayonnaise before the top buttery toasted bun. 


Related Posts Plugin for WordPress, Blogger...