Showing posts with label Sandwich. Show all posts

Monday, 22 February 2016

#48 - Chicken with Mushroom Sandwich

Yum


It has been a long weekend for me. I was actually sick over this last weekend and as a result, I had to cancel/postpone all my work commitments so that I could get some rest at home and focus on recovering soon. 

But as always, whenever I have the full day to myself at home (and this time it was 2 full days), I just could not stay out of the kitchen. I know I am such a contradicting person but it seems like baking/cooking has a healing effect on me. 

This was a really well-spent weekend for me. Not only did I get some rest (away from work), I also managed to accomplish trying out many food items on my To Bake/Cook List. I am so excited to share these recipes with all of you on MMC. I promise, you will soon see the following recipes coming up on MMC. 
  1. Peanut Butter Bread
  2. Stir Fry Celery with Pork
  3. Lemon Butter Chicken & Rice (One-Pot)
  4. Pineapple-Berry Lemonade Popsicles
  5. Bailey's Ice Cream
  6. Tuna Salad Burritos
  7. Laksa Fried Rice

Another good thing about a well-spent weekend is that you will wake up on a Monday morning, feeling great about the start of the week ahead. This was exactly how I felt this morning! 

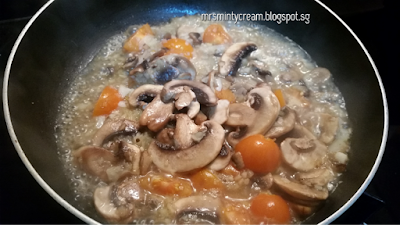
To kick start the week ahead, I decided to put in a little more work into this morning's breakfast and this was what I came up with - Chicken with Mushroom Sandwich. Mind you, I added a little bit of wine into this recipe and the result was EXCELLENT. The splash of wine really built up the flavour and its fruity taste goes really well with my favourite, mushrooms! 


I feel so satisfied now(and ready for the rest of the day) after such a hearty and tasty sandwich! I totally see myself making more of such sandwiches very soon and in my next try, I am already decided that I shall be adding some cheese to go along with this recipe. Imagine the cheesy goodness together with the mushroom and chicken. Wow! 

***************

Recipe: Adapted & modified from Pass the Sushi

Servings
2 Sandwiches (4 slices)

Ingredients
Chicken Thighs (2 pieces)
Garlic Salt (to taste)
Black Pepper (to taste)
Butter (1tbsp)
Corn Oil (1tbsp)
Onion, chopped (50g)
Garlic, chopped (35g)
Mushroom, sliced (90g)
Cherry Tomatoes (5 nos)
Wine, of your choice (2 tbsp)
Chicken Stock (2 tbsp)

Directions
1. Season chicken thighs with garlic salt and black pepper to taste.


2. In a saucepan over medium heat, add in butter. Sear chicken (on both sides), skin-side down until golden brown. Transfer to a plate.


3. Once chicken has cooled down, shred it into pieces. Set aside. 

4. Add corn oil to the saucepan and lower heat to medium. Cook onion and garlic until they are fragrant. Stir well.


5. Add in mushroom and cherry tomatoes and cook for 5 minutes until they soften.


6. Add in wine and chicken stock before seasoning with salt and pepper. Cook for another 1 to 2 minutes. Set aside.


7. Lightly butter the bread. Using air fryer, toast the bread at 160C for 2 to 3 minutes until it is lightly browned. 

8. Remove bread from air fryer and start assembling the sandwich with the shredded chicken (Step 3) and mushroom mixture (Step 6).


9. Serve warm. 

Thursday, 22 October 2015

#44 - Air-Fried Ice-Cream Sandwich

Yum

If you know me better, you'll know how much I adore simple and easy to do recipes at home. I believe in making food with simple ingredients and techniques that do not put beginners-in-kitchen off. This is one of such recipe! 

Air-fried Ice-Cream Sandwich, something I would even recommend you trying out together with your kids at home. I am sure they will have plenty of fun helping out with the scooping (of ice cream),  cutting & pinching (of the sandwiches). Not to mention, the yummy treat of their favourite ice-cream at the end of the day. 

And since we are using the air-fryer for this recipe, you don't have to worry about the mess that will be created. No greasy oil spills and definitely a healthier option in my opinion. Go try it!  


***************

Recipe: Adapted & modified from <The Baking Biatch>.

Serve 2

Ingredients
Wholemeal Bread - 4 slices
Ice cream - 2 scoops
Almond (diced) - 2 tbsp
Butter (melted) - 20g

Method
1. Place a scoop of ice-cream on one slice of the bread. 


2. Sprinkle the top with some diced almond before covering it up with another slice of bread.


3. Using a small bowl or a cookie cutter of your choice, cut out both slices of bread. Avoid cutting into the crust of the bread to ensure good sealing.

4. Make sure that the bread is sealed properly by pinching the edges together.


5. Repeat Step 1 to 4 for the other two slices of bread.

6. Keep the sandwiches in the freezer for at least 1 to 2 hours.


7. Remove from freezer and butter both sides of the sandwiches with some melted butter.

8. Air-fry the sandwiches at 180C, 3 minutes on each side, or until the sandwiches is golden brown.


9. Serve while it is hot.

Wednesday, 5 August 2015

#40 - Toasted Peanut Butter & Banana Sandwich

Yum

Coming back to the scene after taking a 2 months break from food blogging is not easy. You just find it that much harder to get the momentum going. One day I can be super gung-ho, going through sites and books on recipe ideas, but another day I just feel like chucking them all aside, refusing to take a second look at the number of "backlog" recipes I have on hand. 

It is not that I do not enjoy being in the kitchen, snapping pretty pictures of the end products and sharing them with everyone, but I just can't seem to find that motivation for the longest time. But hey, I am back! That's all that matters isn't it?

During this short break, I actually spent more time catching up with friends, put in more hours in my teaching job and more important, I spent more time with myself. I want to believe that I am now stronger and I kind of appreciate life better, as what it is. As cache as it sounds, everything does happen for a reason right? Right.


Back to food blogging. Although I have not been baking/ cooking much lately, one thing that I do engage in on a daily basis (or at least I try to make it 3-4 times a week) is Breakfast Preparation! I do up these breakfast boxes for my hubby so to make sure he has a decent breakfast and he gets all the energy he needs for his work. As such, I am constantly on the lookout for  quick, fuss-free and yummy breakfast ideas. Be it a simple recipe for Tuna Melts (with a twist in adding  cottage cheese and dill) or 20 ways to incorporate colours in your breakfast, count me in! 


And this week, I tried out the warm and sweet Toasted Peanut Butter & Banana sandwich. It is such a yummy alternative to its more popular counterpart, P&J sandwich. Make sure your bananas have really ripen before you do this okay. The nuttiness of the peanut butter goes so well with the sweetness of the bananas. No additional butter or spread needed at all. To add on to the flavour, I added a dash of cinnamon powder over the bananas and YUM! The fragrance of the cinnamon powder just elevated the sandwich to another level. 


This is so simple and fuss-free and you can easily fix this up in like 15 minutes? So why not give this a try tomorrow morning. There! You have something to look forward to for tomorrow already! 

Good day everyone!


***************

Servings
2 Sandwiches

Ingredients
4 slices of Wholemeal Bread
2 tbsp Peanut Butter
2 Banana, sliced
1/4 tsp Cinnamon Powder

Directions
1. Spread peanut butter evenly onto one side of each slice of bread.

2. Using air fryer, toast the bread at 180C for 3 - 5 minutes until it is lightly browned. 

3. Remove bread from air fryer and place banana slices onto the peanut buttered side of one slice of bread. 

4. Dust lightly with cinnamon powder. Top with the other slice of bread and press together firmly. 

5. Serve while warm. 


Thursday, 21 May 2015

#35 - BEC Burger

Yum

I just made this yummy BEC Burger for my hubby this morning and he enjoyed it very much!

Bacon, egg and cheese burger (BEC Burger) is a popular breakfast choice in the United States. Instead of burger bun, it is also commonly assembled in a sandwich form or with a different choice of bread.

Many variations of this burger/sandwich also exist by substituting the choice of poultry (bacon / sausage / ham), choice of cheese (Swiss / cheddar) or even changing the ways of making the eggs (fried / scrambled). A pretty versatile item I would say.


This is definitely one breakfast item that I make pretty often and I especially turn to this recipe when my pantry is running low on supplies. The components needed are few and pretty basic in my opinion and that's a good thing! 


For my version of the BEC Burger, I like my burger bun to be buttery and toasted, and other than bacon, egg and cheese, I also like to add a little bit of Japanese Mayonnaise to it so as to provide a stronger flavour. If I have more components with me, I would also caramelised some onions or throw in some butter head lettuce to add more texture and crunch to the burger. If you ask me, with all the butter, bacon and cheese that go into this burger, it may not be the healthiest burger. But it goes without saying that this burger is good for either breakfast or brunch and is really satisfying in terms of its flavour!  

As with most sandwich / burger, this BEC Burger is best when served hot. 


***************

Serving
1

Ingredients
Burger Bun
Butter
Cheddar Cheese
Egg
Back Bacon
Japanese Mayonnaise 
Salt & Pepper, to taste
Parsley
Paprika


Method
1. Slice a hamburger bun into half, coat each side with some butter.


2. On one half of the bun, top with a slice of cheddar cheese and toast the two halves in an oven / air fryer. I used the air fryer and toasted both halves of the bun (with cheese on one of them) at 180C for 3-5mins. Keep an eye on the cheese slice. Once it has melted, removed toasted bun from the oven/air fryer. You should get a lightly brown crisp burger bun.

3. Using a saucepan over medium heat, fry the egg (sunny side up or over-easy, according to your desired preference). Season with salt, pepper, parsley and paprika. 


4. While that is being done, cook the bacon in the same saucepan until it crisp up. 


5. Remove egg and bacon from pan and you are ready to assemble the burger in your preferred order. My version - Bottom buttery toasted bun with melted cheese followed by cooked back bacon, top with sunny-side-up egg and a touch of Japanese Mayonnaise before the top buttery toasted bun. 


Wednesday, 7 May 2014

#22 - Bak Kwa (Barbecued Pork Jerky) Sandwich

Yum

I know that I ought to be kicked for totally neglecting this site of mine. To be totally honest, I have not been doing much baking / cooking for the past 4 months at all. Yes, I am aware of that. As much as I would like to, I just can't seem to find the right time / mood recently (excuses!). I guess I am displaying my talent for procrastination to my best ability, once again. This is really a bad habit that I must kick (soon).

Anyway, I met up with Mum last week for a short lunch and as usual, she came with loads of goodies for her am-very-fat-daughter, Your Truly. Out of the many goodies, this has got to my hubby's favourite - Bak Kwa! I am not such a great fan for Bak Kwa since it is more like a CNY treat for my family. But rather than having Mr. Lim munching on the Bak Kwa plainly (not to mention, after dinner!), I decided to save them for making some breakfast sandwich for the man instead.

These are the two versions which I am sharing today. One slightly more elaborated than the other, but both as tasty!

This is what Mrs. Lim (That's me!) had for breakfast this morning! Healthy and Yummy! 

And this is what Mr. Lim brought to work as his breakfast! 
Extra Bak Kwa at the side for his to munch on! 


I just could not resist and had to take two (not one)  HUGE bites!


***************

Servings
3 Sandwiches

Ingredients
6 slices of Wholemeal White Bread 
2 eggs 
Butterhead Lettuce
2 slices of Cheddar Cheese
Japanese Mayonnaise 

Directions
1. Using a saucepan over medium heat, fry the eggs (sunny side up or over-easy, according to your desired preference). 


2. When the egg is almost done, place the slices of lightly-buttered bread on the hot saucepan. Toast it for 2-3 minutes and you will get a lightly brown crisp bread. 


3. Wash and pat dry the Butterhead Lettuce. Place the lettuce on one slice of bread before adding a slice of Bak Kwa on top of the lettuce. If you would like to, you may heat up the Bak Kwa slightly before assembling the sandwich.


4. Add the fry egg and a slice of cheddar cheese on top. The heat from the egg will ensure the cheese melts a little before serving. 


5. Top with more lettuce, Japanese Mayonnaise and lastly, a slice of bread. 


And then, you have it! A perfectly simply and yummy sandwich to be packed for breakfast or even a on-the-go lunch! Add in some fruits and MORE Bak Kwa and you have it!


#P/S: For the simplified version, simply omit the use of egg and cheese in Step 4 and you have it! Equally tasty! 


Related Posts Plugin for WordPress, Blogger...