Thursday, 1 September 2016

#52 - Honey Bread Loaf

Yum

If you are looking for a bread recipe that does not require butter, egg or even milk, you have found it! This is the soft & yummy Honey Bread Loaf that I always turn to when I am running out of ingredients in my pantry. This recipe is so easy that even a beginner will have no problem with it at all.


The bread you will get is slightly sweet (not too sweet) and you will be able to taste the honey but it is not overpowering at all. Fresh or lightly toasted, the bread taste just as good!

***************

Free printable version of recipe - Click here

Ingredients
Water – 220g
Raw Honey – 60g
Caster Sugar – 20g
Salt – 5g
Bread Flour, sifted – 375g (up to 2 tbsp more, if necessary)
Yeast – 6g
Corn Oil – 20g

Method
1. Pour water into the bread barrel.

2. At each corner of the bread barrel, add in honey, sugar and salt.

3. Add in bread flour on top of the wet ingredients. Make sure the wet ingredients are well covered by the flour.

4. In the center of the flour heap, make an indentation and add in the instant dry yeast. Cover up the yeast with the flour.


5. Secure bread barrel in the bread machine.


6. Select "Custom Procedure" function on your bread machine (On my Donlim T15A Breadmaker, I selected function "21") and input the following settings before selecting "Start".

First kneading - 20 minutes
First proofing - 1 hour
Second kneading - 30 minutes
Second proofing - 1 hour
Baking - 1 hour


7. 10 minutes after first kneading, you should see the dough being formed. Add in corn oil at this stage before continuing the process. Keep an eye on the kneading of the dough. You may add in more bread flour (up to 2 tbsp) to achieve the right consistency (dough should not be sticking to the bottom/side of bread barrel)


8. After second kneading (before the dough undergoes second proofing), paused the machine and remove the kneading blade from bread barrel. Continue with second proofing and baking.
9. When bread is ready, remove bread barrel from the machine immediately. 

12. Transfer the bread to cooling rack to allow it to cool completely before slicing and serving. 


Saturday, 27 August 2016

#51 - Rainbow Popsicles

Yum

You know that it is summer time when you are craving for something icy cold and refreshing like these homemade popsicles! Yay to homemade goodies! Don't you just love homemade food like I do? The beauty of these homemade goodies are that they are free from sugars and artificial flavourings. You don't even have to worry about additional colourings or chemicals being added. These rainbow popsicles are made with just fruits and nothing else! Isn't it just great!


These popsicles are so easy to make that I am sure you will enjoy making them as much as you enjoy eating them!

I simply love how pretty these little things look! To make these pretty yummies, you need nothing more than different types of fresh fruits and a blender. That's it! You can also get creative by arranging the layers of fruits puree in any order you prefer. 

What are you waiting for? Head straight into your kitchen and make some of these pretty rainbow popsicles now! 

***************

Recipe: Adapted and modified from here
Free printable version of recipe - Click here

Servings
8 Popsicles (depending on size of the mould)

Ingredients
Strawberries (blended) - 200g
Oranges (blended) - 200g
Pineapples (blended) - 200g
Kiwis (blended) - 200g
Blueberries (blended) - 200g

(Optional)
Coconut Water -1 to 2 Tbsp


Method
1. For each of the different coloured fruits layers (red - strawberries, orange - oranges, yellow - pineapples, green - kiwis, blue - blueberries), place the fruits in the blender and blend until a smooth puree is obtained. Remember to wash the blender thoroughly before blending the next layer. 


2. For fruits like the pineapples and blueberries, you may wish to add in 1 to 2 tbsp of coconut water to allow smoother blending of the puree. 


3. Distribute the different coloured fruits puree evenly into the popsicles mould, layer by layer. 

4. Freeze the popsicles for at least 6 hours (or overnight) until the popsicles are firm. 

5. To remove popsicles from their moulds, dip moulds in glass of water for 10 seconds. This will ensure the popsicles come out smoothly from the moulds. Serve while popsicles are firm. 


Sunday, 20 March 2016

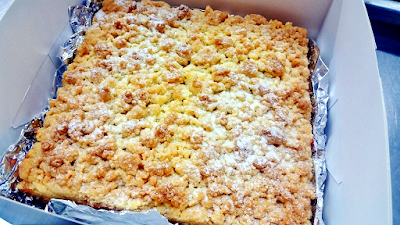
#50 - Raspberry & Apricot Crumble Cake

Yum

This is a recipe I learnt recently from a baking class at Phoon Huat. Crumble Cake, also known as the crumb cake, is the perfect cake to go with your coffee in the morning. In my opinion, for a crumb cake to be good, the proportion of the crumbs to the cake is very important and this recipe just hit it for me. If  I have to change something, I would probably replace the icing sugar in the streusel topping with brown sugar instead. That would give it a better sweetness and colour to the top. 

Although the recipe uses frozen raspberry and apricot, feel free to substitute that with a whole range of fresh fruits strawberries, peaches etc.) that you can choose from. The fresh fruitiness will be one of the kick for this crumb cake. 


***************

Recipe: Adapted & modified from Chef Patrick (Phoon Huat).

Ingredients

Sugar Dough Pastry (Base)
Unsalted Butter (softened) - 125g
Caster Sugar - 62g
Egg - 30g
Plain Flour - 180g

Strussel Topping
Unsalted Butter (softened) - 100g
Icing Sugar - 40g
Ground Almond- 40g
Plain Flour - 150g
Baking Powder - 1/2 tsp

Almond Butter Filling
Unsalted Butter - 125g
Caster Sugar - 80g
Eggs - 2nos
Plain Flour - 65g
Ground Almond - 80g
Vanilla Extract - 1/2 tsp

Strawberry Jam - 5 tbsp
Raspberry (frozen) - 80g
Apricot (frozen) - 80g


Method

Sugar Dough Pastry (Base)
1. In a mixing bowl, cream butter and sugar together.


2. Fold in the egg and ensure that mixture is well mixed.

3. Add in flour to the mixture and combine to form a dough.

4. Once dough is formed, cover with cling wrap and rest it in the fridge for 40 minutes.

Streusel Topping
5. In a large bowl, combine all the ingredients, butter, icing sugar, ground almond, plain flour and baking powder.


6. Using rubbing method, rub & mix all the ingredients together until they are well-combined into a crumble texture.

7. Set aside for later use.

Almond Butter Filling
8. In a mixing bowl, cream butter, sugar and vanilla extract together until a creamy texture is obtained.


9. Add in eggs (one at a time) to the mixture and ensure it is well mixed.

10. Gradually add in the flour and ground almond and mix well.

11. Set aside for later use.

12. Preheat oven at 170C.

13. Remove sugar dough from fridge. Using a rolling pin, roll the dough to 1/2cm thick and cut out to the shape of the square mould.

14. Place the sugar dough cut-out in the mould.

15. On the sugar dough in the mould, spread a thin layer of strawberry jam followed by half portion of the almond butter filling.

16. Lay the raspberry and apricot on top.


17. Spread the remaining amount of almond butter filling on top of the fruits before sprinkling the streusel topping on top.

18. Bake the cake at 170C for 45 minutes or until cake tester come out clean when inserted into the centre of the cake.


19. Remove cake from oven and allow it to cool slightly while it is still in the mould. Dust with some snow powder or icing sugar before serving. 


Related Posts Plugin for WordPress, Blogger...